Saturday, March 17, 2012

Rocky Road on a Stick

I am a sucker for a pretty dessert, typically when they are pretty they also taste amazing and that is a bonus. Pleasing to the eye as well as the belly. Cake pop have been all the rage and I am just not that into cake. I do enjoy cake but not enough to bake it and then proceed to shred the hell out of it in my food processor. But, I do like things on sticks! I wanted to try my hand at making something pretty for an up coming baby shower. I did learn a few things that I will share.


Brace yourself, it is going to get sticky in here!

For this mission you will need:
Wax Paper
Mini Treat Cups OR Baking Cups
2 Ounces Slivered Almonds
One bag of Large Marshmallows
Blender

Yields about 25 Pops

Run the almonds through either a food processor or a blender. Leaving a few larger pieces to give the pops a nice texture. I used my small personal blender with the flat blade, worked great!
I started with just 4 cubes of chocolate and was going to see where this crazy ride took me. Those 4 cubes made way more coating than I expected, it was nice surprise. 
Melt the chocolate per the instructions on the container. I knew the chocolate was going to need to sit there for some time so I grabbed my fancy heating pad, threw a dish towel over it and set my bowl of melted chocolate on top. It worked! I left the pad on the medium setting and that seemed to be just enough to keep it from cooling off right away. I did end up throwing it back in the microwave once or twice to remelt but toward the very end of the process.

Dip the tip of the stick into the chocolate. This will help with securing the marshmallows on as well as coat the top making it easier later when trying to coat the whole marshmallow.  
             

Insert the stick into the marshmallow.
Once the chocolate has set you can start to dip the whole marshmallow in the chocolate.

I had my wax paper set as well as my small bowl of crushed almonds. Once I dipped the chocolate I dipped the bottom of the marshmallow in the almonds and rolled it slightly in the almonds as to cover more of the bottom and sides.

Set them on your sheet of wax paper and let them cool. 
I decided that since the bottom of the pops would look nice I didn't want to use tall baking cups so I found treat cups. They are just shorter but will keep them looking complete. They are new and don't come in pretty colors, just white.
I played around with some other items I had on hand. I had some cocoa pearls I bought at Trader Joes. I also used blue sprinkles. Tasty and pretty, score!


I had planned on topping them with something pretty but ran out of time and patience ( as did my daughter)
Here is an example of one of many things you could do. I just knotted some brown and pink ribbon.

This was fun and easy. I like they way they turned out and would certainly do them again.

enjoy!


Monday, February 20, 2012

Manicure Kit

Please excuse my absence, my computer is ill. Nothing too serious, I hope! I had planned on sharing our fun Valentine's events but will perhaps blog that early next year. I have limited computer access so for now, I am low-tech and creating fun things for The Vivid Peach and figuring out the details for our out-of-state move *yikes*.
This is something I have had at the shop for sometime and finally spent more time refining it and making it easier ( and less expensive) to ship! These are manicure kits, in a lovely jar. This is my new favorite design, I call it "Hello, Sunshine!". I have one sitting on my nightstand, so pretty. My daughter will bring the jar to me and ask me to paint her "tootsies". I have small bottles of nail polish that fit so well in mine. 

Enjoy! 
<3


Monday, January 16, 2012

Flower Button Hat {DIY}


Hats are like cookies, they disappear quickly when you give them to kids! I bought 3 at the start of the season and I know where one currently sits. I am sure they will all show up at one point, most likely when I need them least like around the 4th of July. I will be digging for her swimsuit and will find all the mates to her socks and hats
.
Now that hats and mittens are on clearance I thought I would grab a few hats for our dwindling collection. I saw knit caps at Target, they were in the adult section but both my daughter and I have large heads. I tried one on and it covered about 1/3 of my massive skull. Juice, on the other hand, was able to pull it down to her ears. SCORE! I grabbed 2 at $1.50 each. I knew I was going to do a flower on the plain pink one but not sure what I was going to do with her striped hat. I went to work playing with my large stash of buttons and threw together many option before finding the one I loved.
How to do it all
◘Thread a length of ribbon through two buttons and tie a knot in the back to keep them secure until ready to glue to hat.
◘ Position button stacks leaving about 2 inches of extra ribbon hanging off edge of hat.
◘ Apply hot glue to the back of each button stack and attach to hat. Making sure, when attaching the glue, you don’t apply too much or you risk gluing the hat together. Once I glued down each button I made sure I could still open the hat.
◘ Once buttons are secure flip the hat inside out and glue the ribbon down to the inside of the hat. I keep one sewing needing for placing small items on hot glue, it saves my fingers from burns. I place the glue and use the sewing needle to press the ribbon into the glue.
 IMG_0717
◘ Trim the ribbon

I made two hats and this is my favorite, I will try to write up a tutorial on the other at some point. For now you can just see how cute Juice looks in her hats!
I believe she had grown tired of the flash
Ok, mom, NO. More. Flash!
Hat number 2.


Enjoy!


Friday, January 13, 2012

Yarn Heart {DIY}

Valentine’s Day is fast approaching and my Christmas wreath just can not swing working two holidays, so that baby needed to come on down! Don’t get me wrong, I love my Christmas wreath, it took me so very long to make. The only part I don’t like is the bow, too small but I had other things to deal with at the time so left it as is. I was also foolish enough to think I could make one for each of my sisters and my mother for Christmas! As if my husband having back surgery and my daughter turning two wouldn't keep me busy enough! 
Green Christmas Wreath with Bells and Mini Bow
I found this great idea over at A Little Tipsy. My problem is that most of the fabric  I have just wouldn't work so I grabbed my yarn. 


♥ I cut out a heart from a scrap of cardboard


I took the thick pink yarn and tied a knot on the back of my project. I used my fancy glue gun to attach the knot to the back, a little added security. I started wrapping the yarn around the heart and would double back at some points to give it a more random look, this also helped mask the fact that I had to go over the points of the heart many times to get full coverage on the heart. I would suggest you make sure your ball of yarn fits through the opening in your heart ( sounds like you might need to see a doctor) you might have to make small balls of yarn and use several of them to make this. I didn't use a whole skeen of yarn, maybe 3/4 of one. 


When I got to the humps on the heart I fanned out the yarn and went in more of a random fashion, those humps are tricky! I did this to stop it all from sliding down and would also stop and drop some hot glue on the back to keeping it in place.
Once I was done, I tied a knot and glued  down the tail of yarn.


A lovely length of bright white ribbon and a smashing bow and you are done!


Enjoy!


Tuesday, January 10, 2012

Chalk Shape Game

We are accustom to below freezing temps and foot high drifts of snow this time of year. We are not used to 53 degrees and clear sidewalks. I am loving it but am slightly stumped on what to do. We have snow pants and sleds all geared up and ready to sled, we have tucked away all our outside toys and they have taken down the swings at the park. Here is the time to put on my thinking cap and get the heck outta the house!
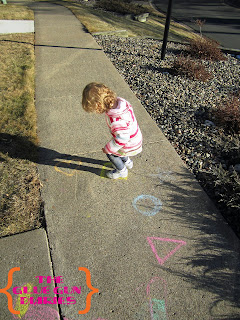
The sidewalk chalk has just been staring at me daring me to come up with something that doesn’t involve Clifford the Big Red Dog or animal crackers. We did the standard body outline on the sidewalk, we added brightly colored shoes to is so no one in our neighborhood worries that a midget passed in front of our home.
My daughter is bright but I wasn’t sure if she could handle a standard game of hopscotch so I made up what turned out to be a wildly fun game. She actually asked to play it again this morning, score one for this mama!


I drew basic shapes on the sidewalk and would ask her to do simple things in each shape/color.
-Hop 3 times in the orange heart.
-Sing “Happy Birthday” in the pink triangle.
-Stand in the blue circle and spin around.
-Put 3 rocks in the pink triangle.
Once she is able to grasp all the standard I will try to add more complex things but for now, we are just happy saying “Hi” to Daddy while standing in the gray star. This activity lasted a lot long than I could have imagined, I think it was a good 15 minutes of pure toddler glee and mama calm.


Action shot of jumping in the pink triangle.

This was so simple to do but so much fun for both of us, I think I might have even got a little tan.

signature copy

Sunday, January 8, 2012

Sweet Blueberry Snack

I am always looking for new and tasty snacks. This was today’s creation:
CLose up BB
This blueberry jam is from a local Orchard and is just FABULOUS! You don’t really need much jam, a very small amount will add just the perfect touch of sweet. I have also had this with cracker pepper  Table Water crackers, just as tasty and far less fat in the cracker.
Enjoy!

signature copy

When you have time (Printable)

Having time isn’t once what it was for me. Now, when I have time I get things done. Before having a child, 2 dogs,  and a cat when I had time I would watch tv or read a book. Oh, how things have changed. I look back at my single life and think, sweet Lord, I was bored!
I wanted to make myself a “To Do” list but often find that term daunting. I am not lazy, just realistic ( for the most part) about what I can get done in a day. So I figured a “When you have time” list would take the pressure off so I can enjoy my time with my daughter and get things on the list done…when I have time.
When you have time side by side copy
( Click for larger view) To save right click and save.
I made this up and put a copy of it up on our family message board and will tick things off as I go. I made it larger so there was room for notes and for me to put lots of stuff on it. No sense in slapping one or two things on there, I like to see a list with things crossed off, I have a purpose!
I hope this list helps you get things done, when you have time, of course!


signature copy


Friday, January 6, 2012

White Chocolate Cranberry Oatmeal Cookies:Gift Style


I am not all that fond of cooking, but I love baking! I can't really say why but I am far more comfortable with a beautiful bowl full of flour, baking soda, and salt than I am with 5 minute rice.  I enjoy spending time with my 2 year-old, she loves dumping all the measuring cups in the bowl for me.  She gets excited when I tell her we are going to make cookies and runs over to grab her large step stool and stands still long enough for me to tie her apron around her neck. My little cookie rock star! She isn't always as helpful, I did have to retrieve a small Little People puppy and cow from my canister of sugar and she insisted upon feeding baking soda to her horse. <3


I had made this recipe before but just wasn't a fan so I made it my own. I am in love! The white chocolate is so much more of a compliment to the cranberries than the semi-sweet chocolate the original recipe called for. They are far better room-temp not fresh from the oven, the chips firm up and are amazing. I will include the recipe on the tail end of this post.


The reason for baking cookies ( as if one actually needs a reason) is that my mother's birthday is this weekend. We already have a wonderful gift for her but I wanted something to do something fun and creative.  So we made cookies for Nana! To personalize the gift and not just hand them over wrapped in a nest of tinfoil or a few sandwich bags I grabbed a lovely gift box from Target and went to work using Photoshop and Shabby Princess digital scrapbook paper. Good times and printer frustration ensued and this is how it looks completed.


I used a small paper punch to slide some dark twine around the box to attach it. The completed print is 5x5. I took some photos of my daughter and me while making the cookies to add a really personal touch to the box, I know my mother will love the silly face my daughter is making, this was I believe my 8th attempt at a photo so  I was pleased she was looking at the camera and not trying to eat flour.  I made up a fun name for our pretend bakery, Peachie Keen Bakery, and it now we look super fancy. I think we might have started a tradition or at least a fun way to give cookies to my family as gifts.
To keep the cookies fresh while waiting to be enjoyed, I put them in storage bags and added some tissue to make the finished product pretty.
I believe it holds about 18 cookies, if I was more patient I would have worked longer to get more cookies in there but, they are tasty so I kept some. Ok, I kept a lot!
Want to make your own cookie box label?  Right click and save! You can either open it in Word and add your own wording or grab your prettiest pen/marker and get a writing.

Enjoy!

Now, on to the recipe.


White Chocolate Cranberry Oatmeal Cookies
Yields appx 3 dozen.


1-1/2 cups  flour
1 tsp. baking soda
1/2 tsp. salt
2-1/2 cups old-fashioned oatmeal
1 cup butter or margarine, room temp.
1 cup light brown sugar, packed
1/2 cup white sugar
2 eggs
2 tbsp. honey
2 tsp. vanilla
2 cups white chocolate chips
1-1/2 dried cranberries


Preheat to 350 degrees.
Blend the flour, baking soda, salt and together in a medium bowl. Stir in the oatmeal.


Beat the butter and sugars together until light and fluffy. Beat in the eggs and add the honey and vanilla, beat until mixed well. Blend in the flour mixture one cup at a time. Hand mix in the cranberries and white chocolate chips.


Drop one tablespoon of dough on to a  lightly greased cookie sheet. Bake at 350 degrees until slightly browned, about 9-10 minutes. Allow to cool some before attempting to transferring to cooling rack.